How to Wrapping Power Automate Cloud Flow using Azure API Management
From the last post, I got a problem when want to call Power Automate Flow using Dynamics CRM Webhook. The problem that I encounter I believe is because there is a certain HTTP header that CRM WebHook not sending. Hence we can't call it. George Doubinski from crmtipoftheday.com told me that suppose this action can be done based on this post. But probably I encountered this error because the environment that I used is the trial instance. Then, in my LinkedInEugene van Staden recommend to wrapped my flow into Azure API Management! Man, I love this community where we can learn from each other! So shout out to both of these gentlemen for the feedback they give to me.
Setup The Flow
The flow that I'm using is still the same for this testing purpose. I just create the trigger point When a HTTP request is received and the next action is Response(HTTP) **** like the below picture:
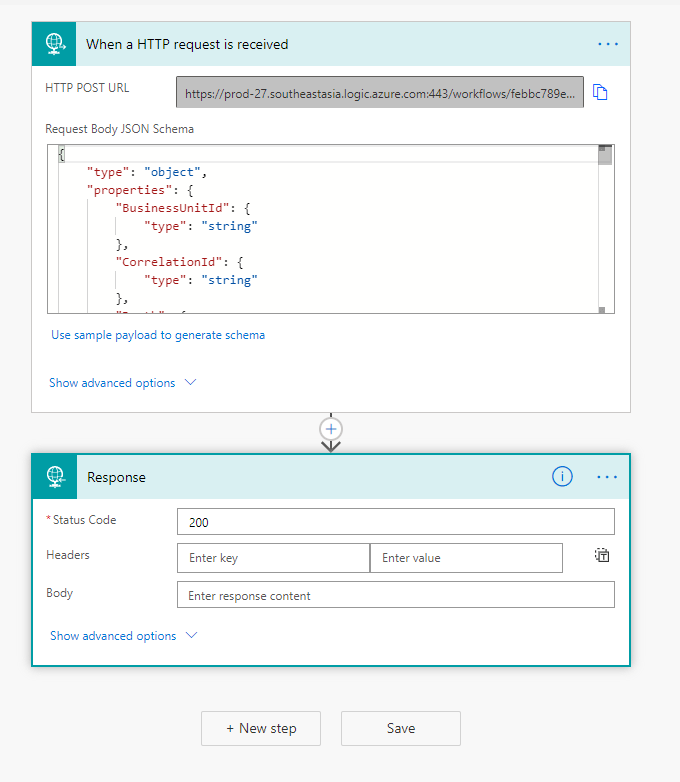 Simple flow for the WebHook
Once we click to save this flow, we will get the URL that we can keep in the notepad:
https://prod-27.southeastasia.logic.azure.com:443/workflows/febbc789e0ad4ed2b649b5f068bee657/triggers/manual/paths/invoke?api-version=2016-06-01&sp=%2Ftriggers%2Fmanual%2Frun&sv=1.0&sig=xxxxxxxxxxxxxxxxxxxxxxx
Setup Azure API Management
The next step is to set up the Azure API Management service. Azure APIM is a service that we can use to wrap any backend services that we have. The benefits of using this service are:
- Add more layers of security
- Improve API discoverability
- Mocking the API for development purposes
- Before calling the real API, there are lots of modifications that we can apply (in this blog post, we will learn: rewrite-uri, set-backend-service, and forward-request)
- Etc
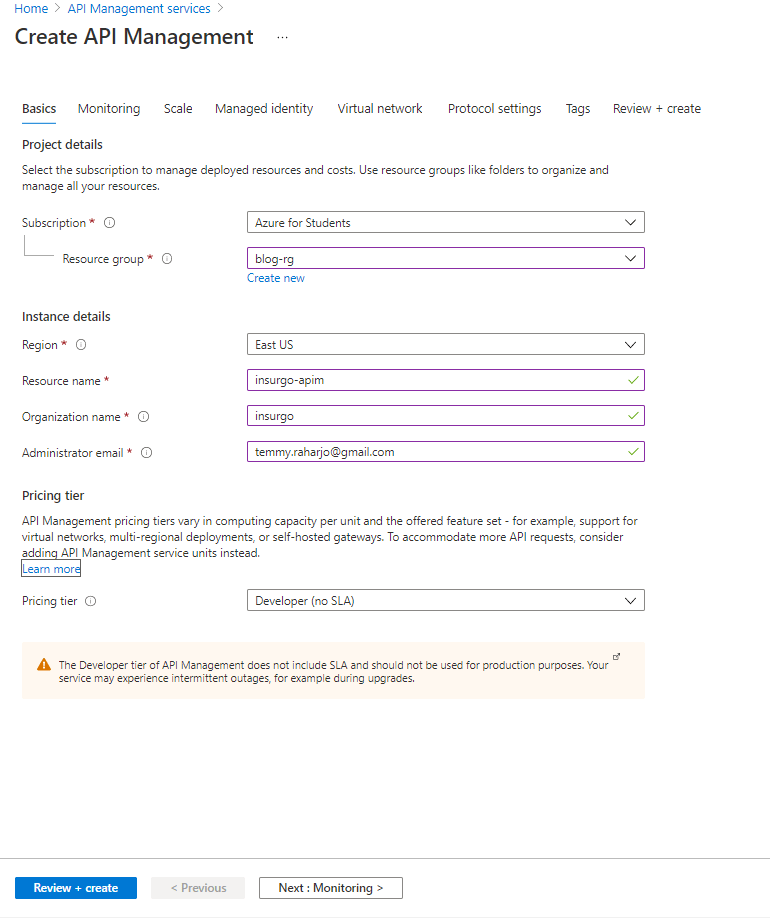
First, we need to create API Management. We just need to set the Subscription, Resource Group, Region, Resource-name, Organization name, and Administrator email. This is my setting:
 Create APIM Dialog
Once the above form you already filled in, you can just click Review + create and create the resource.
After the resource is created, we can go to the +Add API. Here I chose Blank API to create a blank template:
 Blank API Template
We just need to set up the name and click Create like the below picture:
![]() Blank API dialog
Blank API dialog
In the next step, we can click + Add Operation button, here I set the operation as Post. I also put resource-name as /modify-account. Because we set this resource name, later on, we need to set rewrite-uri policy because by default when we call, it will add on https://flowurl/modify-account in behind.
Here is the screenshot of the Add Operation:
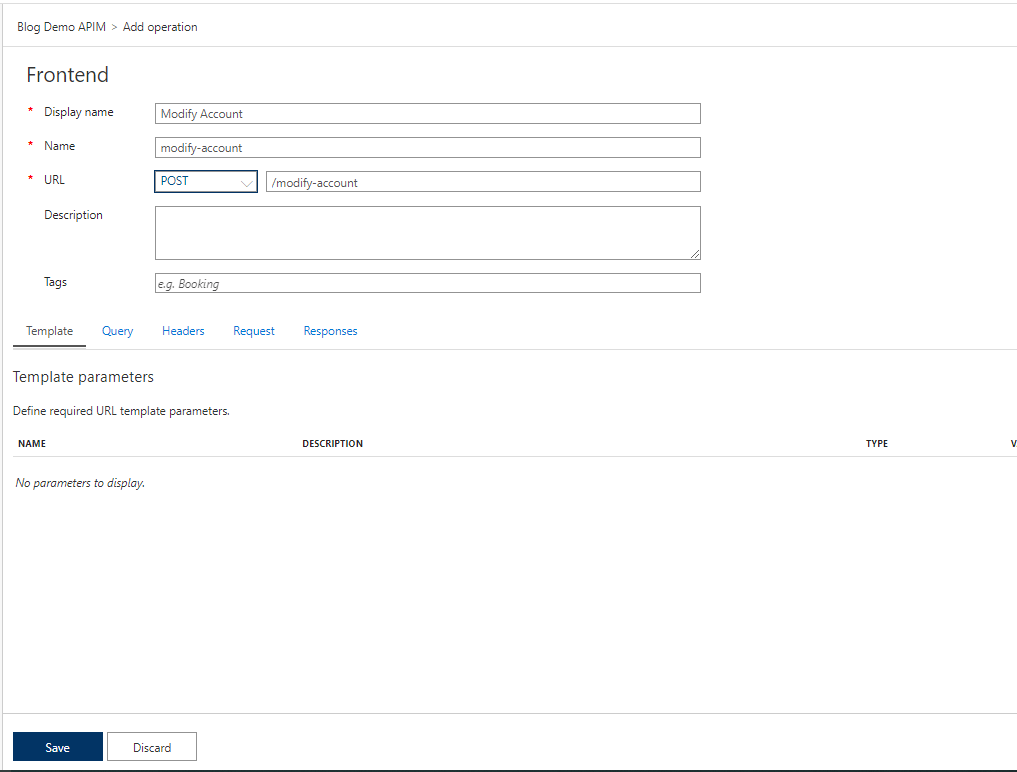 Add a new operation called Modify-Account
After we click the Save button, we will see this blank operation:
![]() Blank Operation Design
Blank Operation Design
For the setup, we need to go to the Backend > click Edit (Pencil), in there we can set up the URL. Because we will call our flow, we can copy-paste the URL we get from our flow. But we need to paste the URL until "paths" only:
https://prod-27.southeastasia.logic.azure.com:443/workflows/febbc789e0ad4ed2b649b5f068bee657/triggers/manual/paths
Then we set our Backend HTTP(s) endpoint like this:
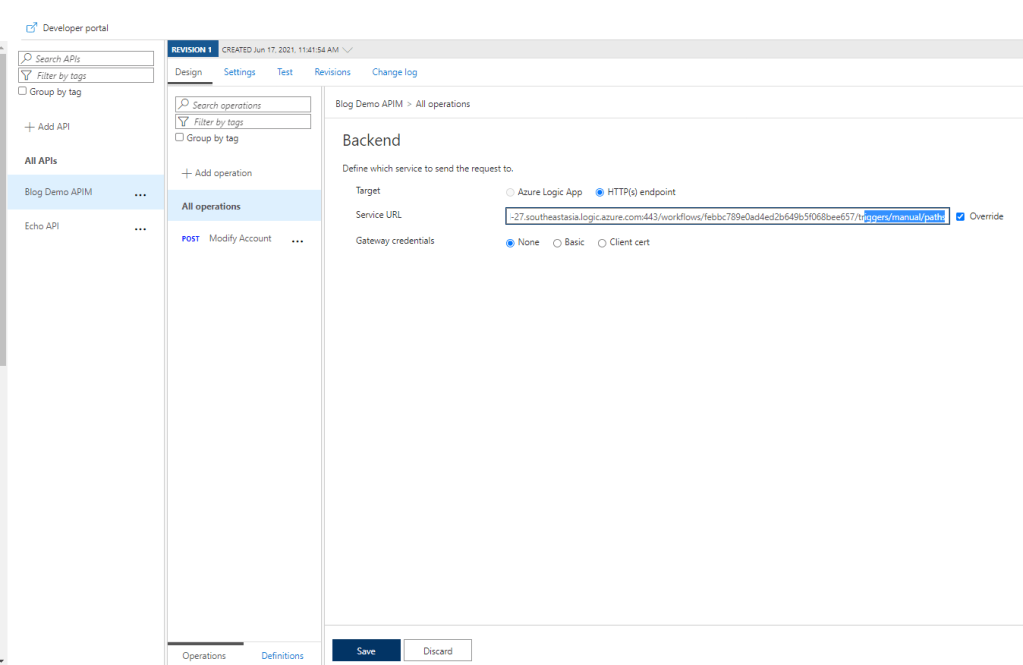 Add Backend endpoint until "path"
Once the backend is set, the next policies that we need to apply are rewrite-url + foward-request:
<!--
IMPORTANT:
- Policy elements can appear only within the <inbound>, <outbound>, <backend> section elements.
- To apply a policy to the incoming request (before it is forwarded to the backend service), place a corresponding policy element within the <inbound> section element.
- To apply a policy to the outgoing response (before it is sent back to the caller), place a corresponding policy element within the <outbound> section element.
- To add a policy, place the cursor at the desired insertion point and select a policy from the sidebar.
- To remove a policy, delete the corresponding policy statement from the policy document.
- Position the <base> element within a section element to inherit all policies from the corresponding section element in the enclosing scope.
- Remove the <base> element to prevent inheriting policies from the corresponding section element in the enclosing scope.
- Policies are applied in the order of their appearance, from the top down.
- Comments within policy elements are not supported and may disappear. Place your comments between policy elements or at a higher level scope.
-->
<policies>
<inbound>
<base />
<rewrite-uri template="invoke?api-version=2016-06-01&-sp=%2Ftriggers%2Fmanual%2Frun&sv=1.0&sig=yourkey" />
<set-backend-service base-url="https://prod-27.southeastasia.logic.azure.com:443/workflows/febbc789e0ad4ed2b649b5f068bee657/triggers/manual/paths" />
</inbound>
<backend>
<forward-request />
</backend>
<outbound>
<base />
</outbound>
<on-error>
<base />
</on-error>
</policies>
With this, our Operation is already done. We can go to Test > then click the Send button at the bottom. When we call, the system will automatically set the header that is required which is Ocp-Apim-Subscription-Key. This key will be our security key to identify if the caller is valid. You also can add another security level, but for me this one is already sufficient for this demonstration purpose.
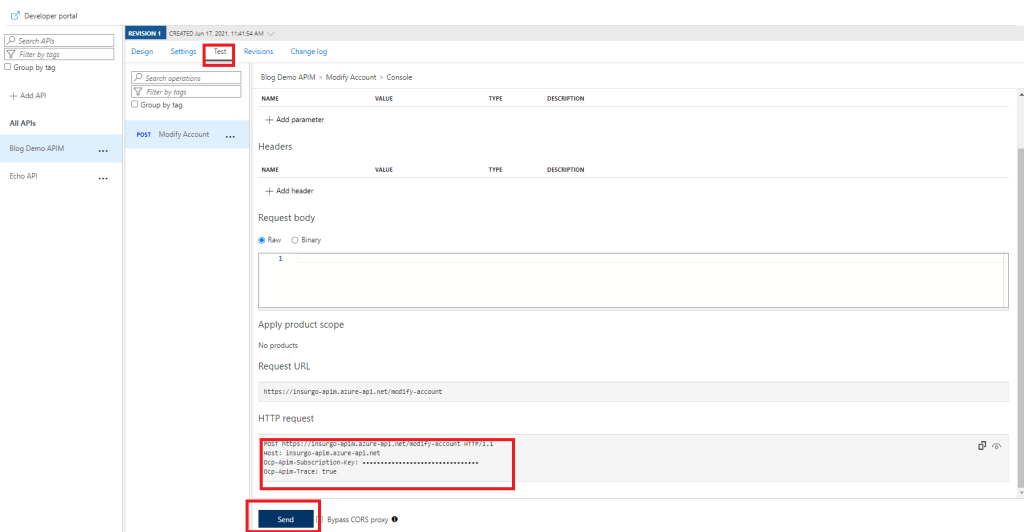 Test our API operation
You can copy the Request URL and copy the Ocp-Apim -Subscription-Keyto be used for the next step in the Webhook endpoint.
From this point. If you go to your flow, you will see that APIM successfully called your API also.
Setup Webhook
This step is actually simple, we just need to register WebHook Url (from plugin registration tool > Register > Register new WebHook):
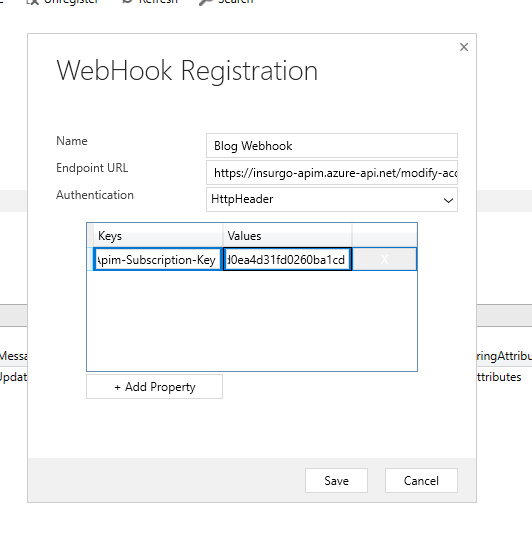 Register the new webhook endpoint
And here is the step for the WebHook:
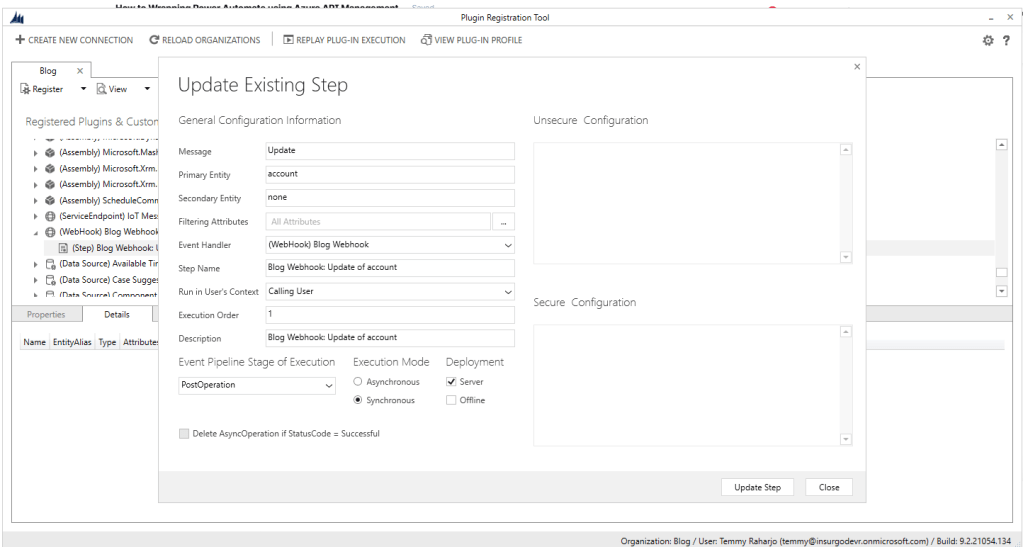 Register Webhook Step
The reason I put it in sync operation is for testing purposes. For production, we are supposed to put it in async mode.
Once we finish this setup, you can try to update any Account and save it. You will see that the flow successfully called:
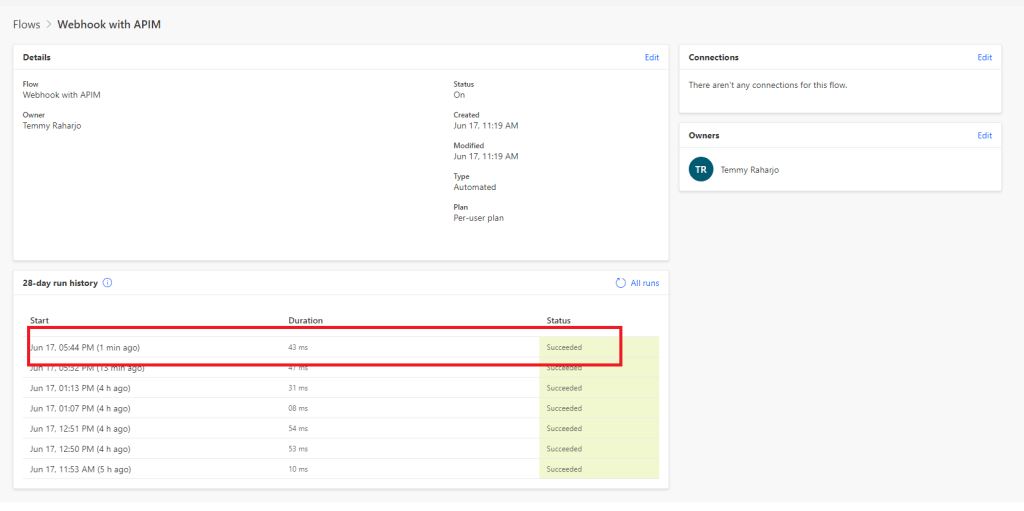 Result
What do you think?
Leave a comment
Your comment is sent privately to the author and isn't published on the site.