Dataverse: How to set a Complex Query for System View
Sometimes, we need to let the user see only the records under their care (dynamically connected via relationships). For example, we have the Region table > User and Order will be linked to the Region. Hence, the user will only see all the Order records that belong to the same Region as the User's Region. Let's learn how to do it using several ***XrmToolBox***plugins!
XML Preparation
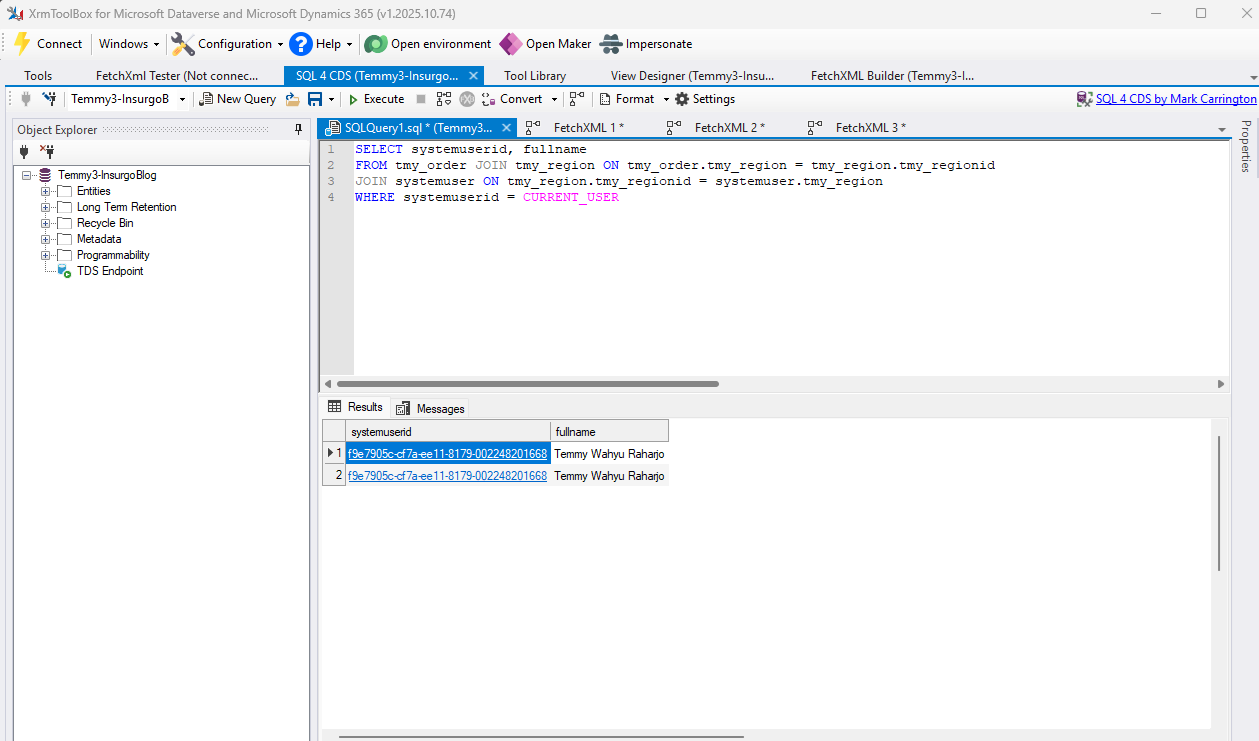
The first step that I'll try is to check if the data can be retrieved via SQL4CDS by Mark Carrington:
Generate the SQL Query using SQL4CDS
First, you need to understand that not all queries can be used in FetchXML (e.g., we can't use a subquery as it produces multiple-step execution). Basically, the rule of thumb is to generate one step FetchXML. To test it, what you need is to click the "Convert" button on SQL4CDSto see the FetchXML generated:
<!--
Created from query:

SELECT systemuserid, fullname
FROM tmy_order JOIN tmy_region ON tmy_order.tmy_region = tmy_region.tmy_regionid
JOIN systemuser ON tmy_region.tmy_regionid = systemuser.tmy_region
WHERE systemuserid = CURRENT_USER

-->

<fetch xmlns:generator='MarkMpn.SQL4CDS'>
  <entity name='tmy_order'>
    <attribute name='tmy_orderid' />
    <link-entity name='tmy_region' to='tmy_region' from='tmy_regionid' alias='tmy_region' link-type='inner'>
      <attribute name='tmy_regionid' />
      <link-entity name='systemuser' to='tmy_regionid' from='tmy_region' alias='systemuser' link-type='inner'>
        <attribute name='systemuserid' />
        <attribute name='fullname' />
        <filter>
          <condition attribute='systemuserid' operator='eq-userid' />
        </filter>
        <order attribute='systemuserid' />
      </link-entity>
      <order attribute='tmy_regionid' />
    </link-entity>
    <order attribute='tmy_orderid' />
  </entity>
</fetch>
As you can see from the above FetchXML, it only produced one FetchXML, which is good for us to use. Keep the XML so we can use it for the later step.
System View
Next, go to the Order(or your main table) table and create a View that will be overridden with the new configuration:
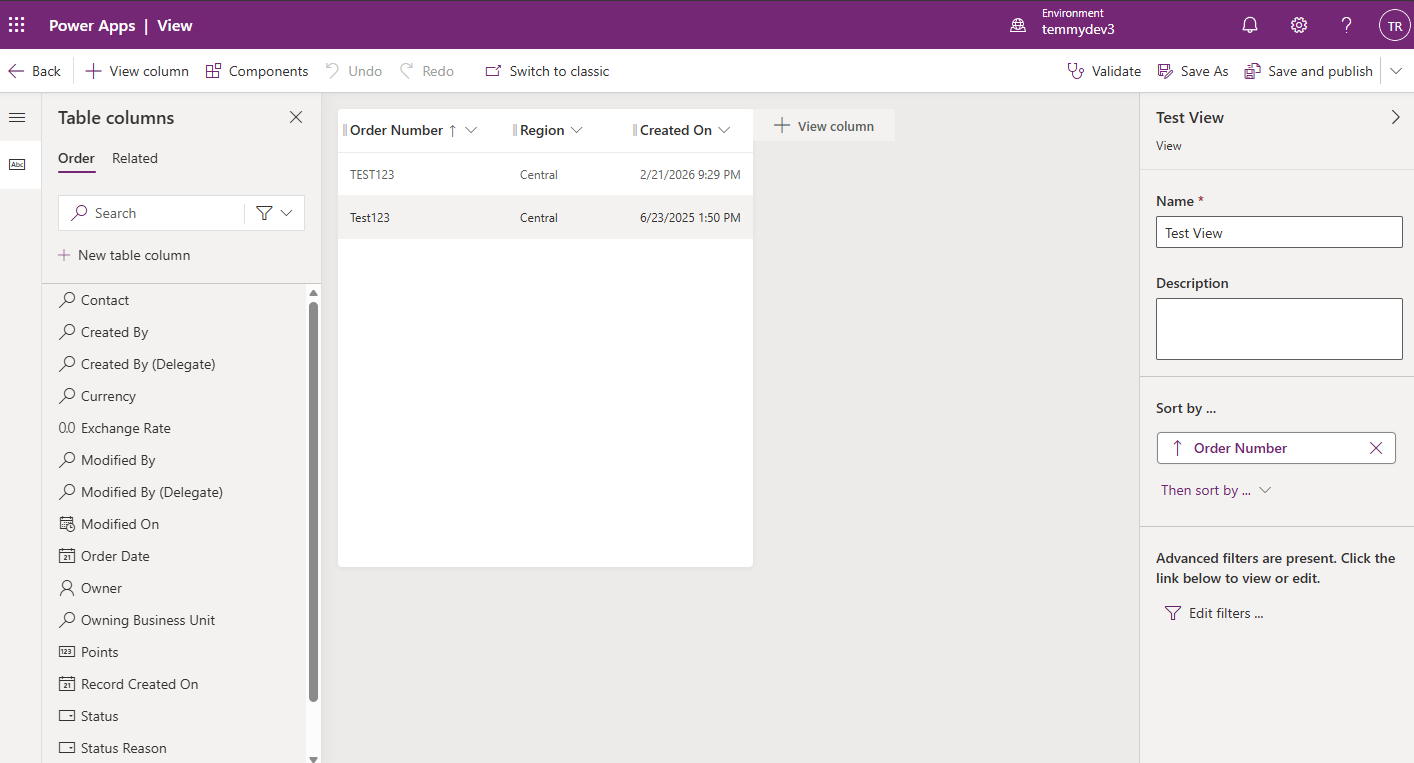
Create a view with the name of "Test View"
Just click **** the "Save and Publish" button > go to your XrmToolBox> Installed View Designer by Innofactor AB and FetchXML Builder by Jonas Rapp.
Once installed, connect to the dev environment > open the View Designer> select the Order (or your main entity) > select the View Test (or your newly created system view) > click the "OK" button:
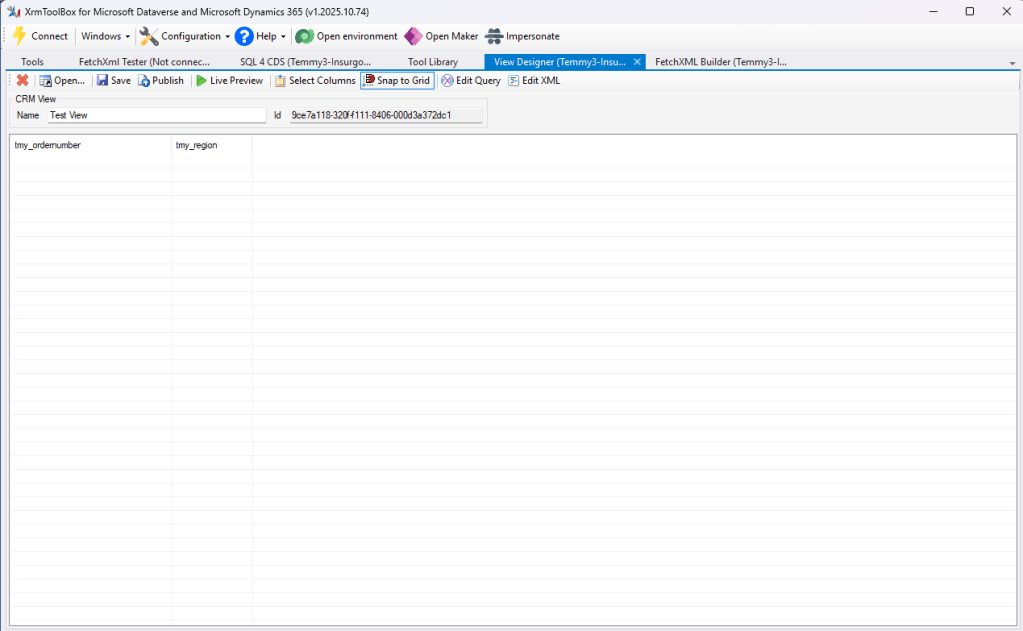
View Designer's UI
Next, you can click the "Edit Query" button in the top section to open the FetchXML Builder tool. Once the FetchXML Builder is opened, you can click the "View" button and select the "FetchXML" button (Ctrl+E):
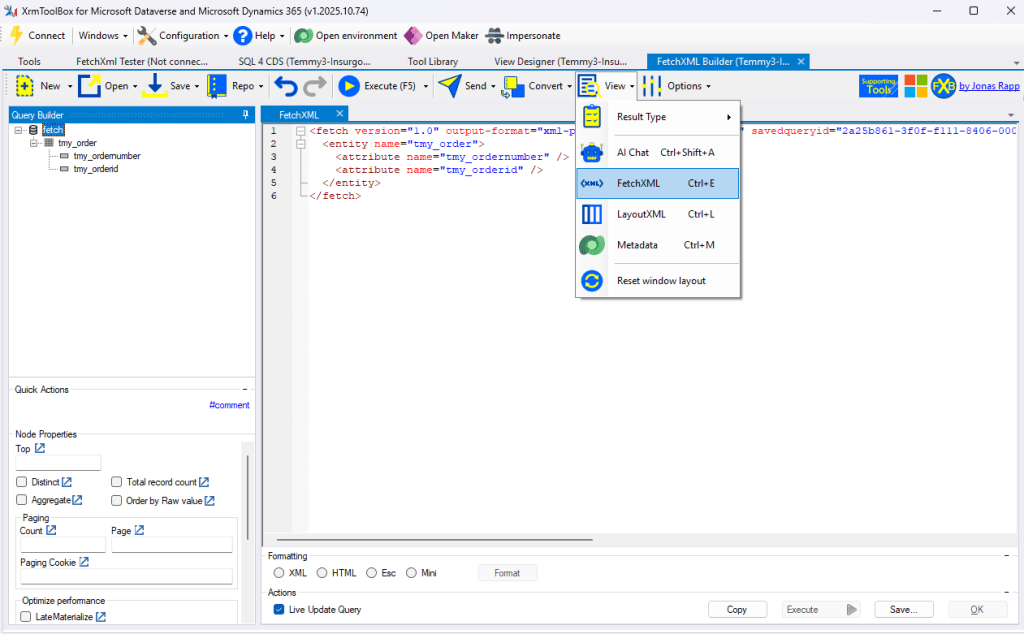
FetchXML Builder tool
As you can see in the above screenshot, the original FetchXML was very simple. Next, we need to merge the XML that we get from SQL4CDS with the existing:

Merging process
From the above screenshot, you will notice that I replaced all the single quotes (') with double quotes ("). Next, from lines 11-22, will be moved to line 5:
<fetch version="1.0" output-format="xml-platform" mapping="logical" savedqueryid="2a25b861-3f0f-f111-8406-000d3a372dc1">
  <entity name="tmy_order">
    <attribute name="tmy_ordernumber" />
    <attribute name="tmy_orderid" /><link-entity name="tmy_region" to="tmy_region" from="tmy_regionid" alias="tmy_region" link-type="inner">
      <attribute name="tmy_regionid" />
      <link-entity name="systemuser" to="tmy_regionid" from="tmy_region" alias="systemuser" link-type="inner">
        <attribute name="systemuserid" />
        <attribute name="fullname" />
        <filter>
          <condition attribute="systemuserid" operator="eq-userid" />
        </filter>
        <order attribute="systemuserid" />
      </link-entity>
      <order attribute="tmy_regionid" />
    </link-entity>
  </entity>
</fetch>
Next, I just copied and pasted the merged FetchXML and click "Send" button, and then clicked "Return to View Designer" to return to the View Designer plugin:
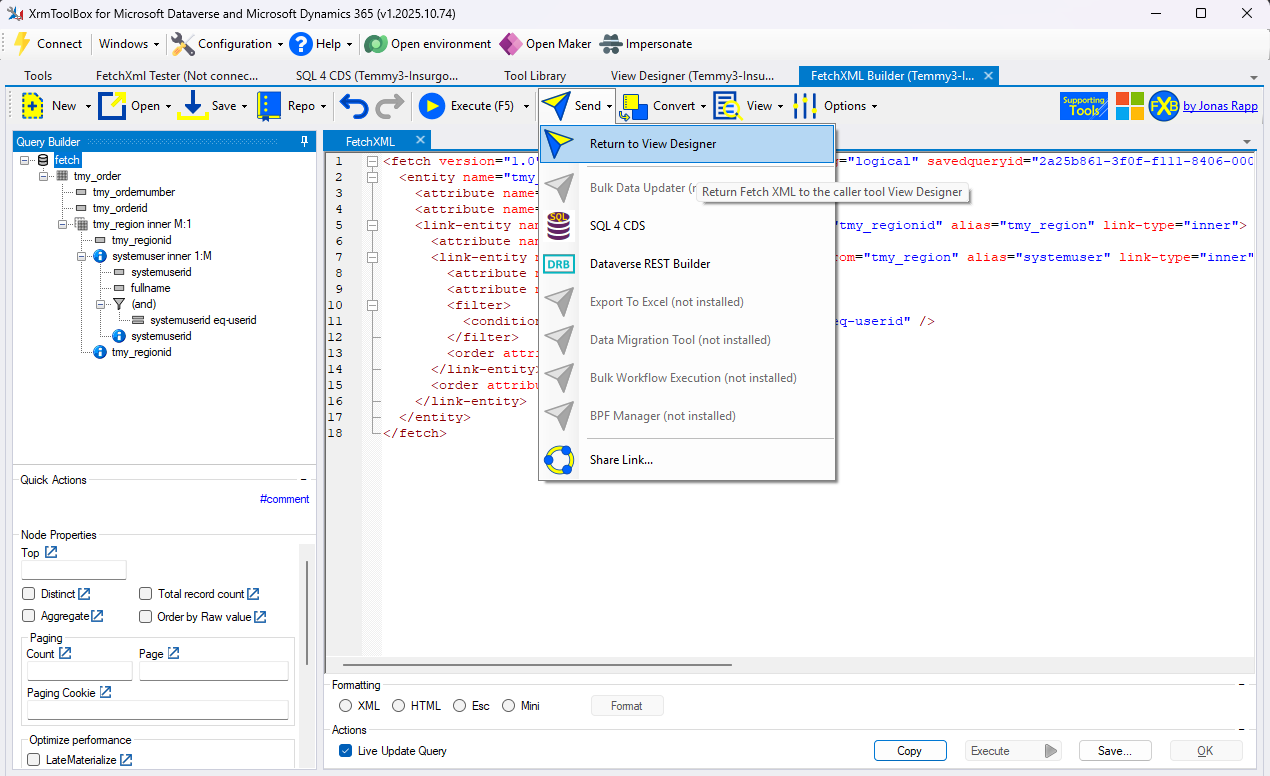
Return to View Designer button
Once in the View Designer, you can click the Save and Publish button. If I need to add more columns and change the size of each column, I will do it via make.powerapps.com > select the table > select the view (as I think adding the columns, setting the size, and adding sort is easier there).
Once you are done, click Save and Publish, and you can try it already!
Result
Go to the MDA (Model Driven Apps) > go to the Order table > select the Test View (if you want to validate, you can open the DevTools and check the Network tab):

Validate the query generated
To validate the FetchXML generated, you can copy the query string after fetchXml. That value is a URL-encoded string that can be decoded using a web like urldecoder.org:
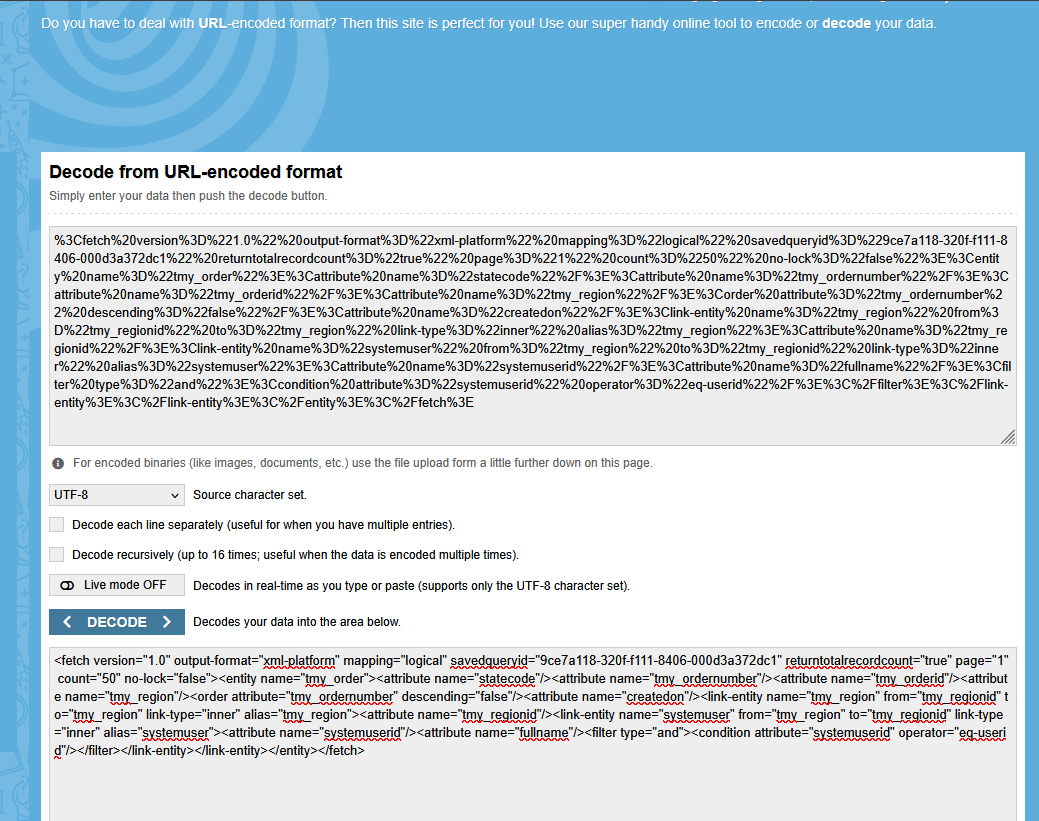
Test View FetchXML
Hope you are learning something today! Happy CRM-ing 🚀!
Leave a comment
Your comment is sent privately to the author and isn't published on the site.